
 Sometimes you need to shake up the lighting. I know you worked hard to set it up and you might be very proud of yourself for the way you did so. It might also be that you have limited gear to work with. But since you also might have limited time with the model--and maybe only one time to work with her--why shoot everything, essentially, the same?
If you're shooting for a third-party client, there might be an expectation from that client regarding consistency. If you're shooting for fun or for TFCD, you might want to shake it up.
I'm not talking about striking your lighting setup and re-setting everything from scratch. Sometimes, all you need to do is move the key (mainlight) or add, remove, or change the fill (or other lights) you have working your set.
Here's some examples. All the changes I made took only a few moments to implement. I didn't have an assistant and I'm pretty lazy so, trust me, making these changes didn't require too much effort.
The first set-up (below) is fairly close to my standard glamour configuration with the exception of there being no fill opposite the mainlight. I guess I was going for something a bit more dramatic: Rembrandt patch, chiaroscuro, and all that good stuff. I shot this a while ago so please forgive me if I can't remember what I was thinking. (Not that I don't often ask myself, "What was I thinking???")
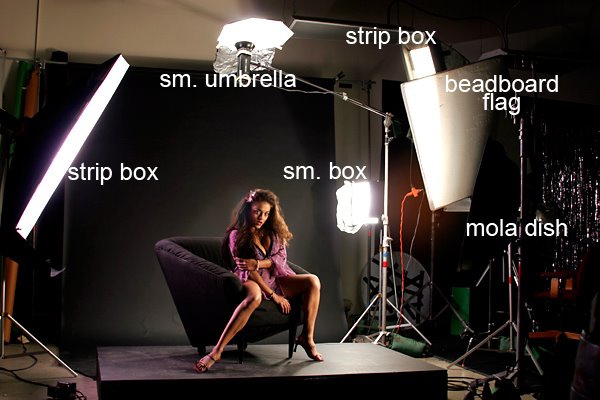
The beadboard flag, BTW, wasn't doing anything special-- It was simply flagging that stripbox, camera-right and behind her, so it didn't cause flares. The beauty dish is set just a little above her and I tilted it up a bit. I was looking to feather the light rather than have it strike her more directly. The camera-right stripbox is edging her body and legs and the the small, camera-right, softbox, as well as the overhead umbrella, are both working her hair. The camera-left stripbox is also edging her with highlights. As I recall, the camera-left stripbox was gelled with some magenta to subtely tie-in her hair and skin (on that side of her) with the primary color of her dress. All the lights working behind her, providing highlights, are also separating her from the background.
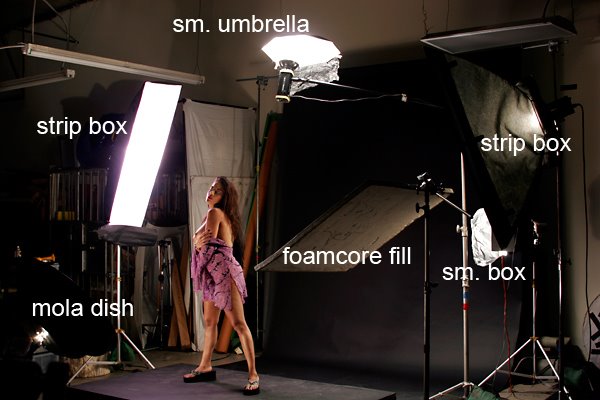
In the following image, I moved the beauty dish to the other side of the riser, or platform, she's standing on. The dish's stand has wheels so I didn't work up a sweat doing this. I also dropped the dish low and tilted it up. All the lights working from the rear were left alone. I re-set the beadboard flag and turned it into a beadboard reflector for a bit of fill opposite the mainlight. How tough was that to do?
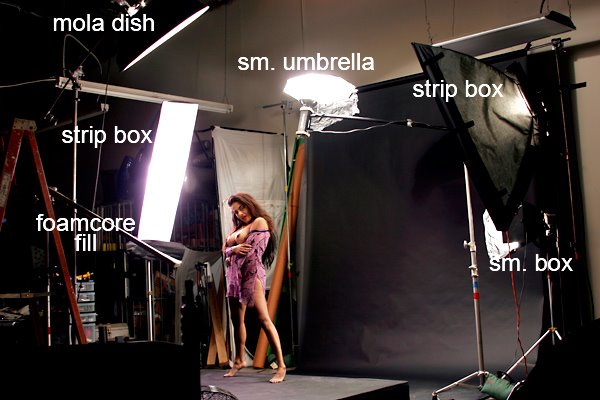
For a final shake-up, I raised my mainlight high and tilted it down. I also reset the beadboard reflector under the dish to clamshell my mainlight. Everything else was left, pretty much, as it had been set. Once again, no sweat broken. But each of these lighting setups delivered distinct images in both lighting and style. All of this took place, BTW, during a two-hour session.
So shake it up once in a while! Later, when you're going through your images, you might be glad you did.
The model featured in this post is Cleo... as in Cleopatra. She really is Egyptian but grew up in Australia and now lives in L.A. Go figure.
Here's a few pics of Cleo from our two-hour session together. Each one illustrates subtle differences courtesy of the easily and quickly performed changes in the lighting. You can spot which image came from which lighting set-up, right? Think of it as a pop quiz.


2 comments:
Ya gotta be kiddin' me...
no final images of the different set-ups???
Come on, dude... break with some photos.
no final images of the different set-ups???
Come on, dude... break with some photos.
dang. sorry. how'd i overlook doing that? ok. i added them.
Post a Comment